Search This Blog

Showing posts with label Cookies. Show all posts

Monday, August 26, 2013

Peanut Butter Cookies

When I was in college, I worked at The Great American Cookie Company. Shocking, I know. What's really shocking is that I hated that job more than any other part-time gig I've held. Probably because it was more of an unwanted full-time gig, while I was a full-time student, and added more stress than any college class would ever cause.

However, they did have good cookies. The job certainly had its perks. My roommates loved that I brought home boxes of cookies and cookie cakes every night.

One of my favorites was the peanut butter cookie. This weekend I made my own peanut butter cookies in attempt to match the cookie that kept me company the first semester of junior year (had I worked there any longer my teeth would have fallen out from all the sugar).


What I loved about those cookies was that they had actual peanuts in them, giving them a little more zazz than plain old peanut butter. I made mine with chopped salted peanuts and peanut butter chips. As always with peanut butter cookies, dab the tops in a bowl of sugar and make the criss-cross with a fork before pressing them down. That's just how peanut butter cookies work! At least in the Chalkey house.


These cookies are so good right out of the oven with a glass of cold milk.

Now we have plenty of cookies in the cookie jar! Which means we need visitors to help us eat them!

I noticed a certain someone got into the cookie jar this morning and left me half a cookie.

Peanut Butter Cookies

Ingredients:
  • 1/2c. butter, softened
  • 1/2c. shortening
  • 2 eggs
  • 3/4c. brown sugar
  • 3/4c. sugar
  • 1t. vanilla
  • 1t. baking soda
  • 1t. salt
  • 2 1/4c. flour
  • 1/2c. peanut butter, I used creamy
  • 1/4c. chopped salted peanuts
  • 1/2c. peanut butter chips
  1. Beat butter, shortening, eggs, both sugars and vanilla together in a large bowl. 
  2. Add in peanut butter until well blended.
  3. Add baking soda and salt. Add flour gradually, until mixture is thick enough.
  4. Mix in peanuts and peanut butter chips.
  5. Refrigerate at least one hour.
  6. Bake at 375 degrees for about 12 minutes. Peanut butter cookies tend to take a little longer than chocolate chip cookies.
  7. Enjoy!

Monday, July 8, 2013

What chocolate chip cookies should NOT look like

I've made chocolate chip cookies probably a thousand times. Ninety-five percent of them have turned out beautifully: plump, soft, gooey chocolate chip cookies.

The other five percent have been interesting products that deteriorated from either a missing ingredient, a mistaken ingredient, or sometimes the missing element of my own common sense. There's nothing that gets my frustration going more than a ruined batch of cookies, but sometimes I just have to laugh about it.

How I've ruined cookies

 Fishy cookies: 

My dad used to fish a lot, and we had a Tupperware container of flour that was supposed to be used only for cooking fish. Well, it wasn't labeled and it looked just like white baking flour. The embarrassing part is not that I made cookies with the fish flour, but that I did it at least four or five times, never learning my lesson. (See, Mom, that's why you have to check by eating the dough first!) Needless to say, those cookies tasted funny.

Most forgotten about ingredient? Any guesses?

Vanilla. Such a small one, but it makes the biggest difference. Taste a cookie without vanilla and you may as well have just eaten a piece of paper.

The tricky ingredient is the flour (white flour, not fish flour!) because too much or too little throws your cookie all out of whack. Don't use enough flour and your cookies will spread twice their size in the oven. One time this happened and one of my cookies spread out so far that part of it fell off the pan. I opened the oven door to see a tiny fire ignited under my pan of inflated cookies.

I've had a good streak going, having made at least a dozen awesome batches this year. My time was due.

Every year I try to make cookies for my friends' husbands on their birthdays. Those wives can cook for them, but I get to do some of the baking. Well, Luke's birthday was last week and he seems to have found a new baking mistress where he and Heidi live in Florida. Apparently, this chick makes better chocolate chip cookies than I do.

Challenge accepted...


...and I failed miserably. Perhaps I was so nervous about this other baker that I psyched myself out. When I saw my cookies were spreading in the oven, I knew I had failed. First, I checked for fires. I won that part. Then I tried to think back on any ingredients I might have forgotten or misused. Nothing felt off.
2013-06-28 20.22.50.jpg2013-06-28 20.23.05.jpg
Flat, dull, lifeless. Your cookies should not look like this.

A few days later I was still baffled. Mom reminded me of one thing I did differently: I melted the butter instead of letting it soften for a few hours.

She's good.

I never understood why we had to remember to get the butter out ahead of time instead of just zapping it in the microwave for a few seconds. Ruined, wasted cookies. That's why.

When your cookies spread into gook instead of rise into beauty, all the deliciousness is baked out of them. They tasted dull and lifeless. This was not a cookie I could give to Luke, not when being compared to Miss New Cookie. 

Attempt #2

 2013-07-03 16.50.23.jpg2013-07-03 16.50.07.jpg

Now that's what a cookie should look like!
Nailed it! If these didn't win Luke over, then I was going to have to give Miss New Cookie a call and threaten her for her secrets. He said they were good, but not sure if they were better. I think he's just trying to get me to keep baking him more cookies.

Tuesday, June 25, 2013

Sugar cookie traditions


kidszone.sailusfood.com

A cookie is definitely a tradition when the recipe card is as old as you are, or outdates you. My mom's treasured sugar cookie recipe came handwritten from a neighbor, Marilyn, before we moved into this house, meaning I was younger than three.

Throughout the years, Mom has lost it several times. She usually realizes it is lost right before we need it, like around Christmas time or before my bake sale last weekend. Then she finds it a week after. This is just how things work in our house.

We've always followed Marilyn's recipe either from the card or by memory, but we only make sugar cookies at Christmas. We have cookie cutters for every holiday and occasion, including St. Patty's Day, Girl's Night Out and the dog's birthday, but the only ones we have ever used are the Christmas cut-outs. Yet, we keep buying random cookie cutters because they're so darn cute.

Exhibit A:


When have I ever made cupcake-shaped cookies?

Last weekend I finally made use of our cancer ribbon cut-out for my Susan G. Komen 3-Day Walk bake sale. I quickly realized just how neglected sugar cookies have been in my family.

2013-06-21 21.03.47.jpg2013-06-21 21.04.07.jpg


They are so much fun! Cut-out cookies are cute as can be because you can decorate them with all sorts of colors, and your shape is already cut out for you. And sugar cookies are so darn tasty, too! They're still a lot of work, but they store and keep so much easier than cupcakes. From a baker's view, that's a world of difference.

So, why not make them more often?

It's become an assumption in my family that we make chocolate chip cookies 51 weeks of the year and sugar cookies the other week. I guess it's time for a new project: make more sugar cookies!


Tips for making successful sugar cookies

  • Refrigerate your dough for at least one hour before use.
  • Lightly flour your rolling pin and work surface.
  • Work with one portion of the dough at a time. Keep the rest in the fridge so it doesn't get too warm and difficult to handle.
  • Dip your cookie cutter in flour so it doesn't stick to the dough.
  • Roll your dough out so it's thick. I couldn't figure out why my cut-outs kept crumbling when I picked them up. Then, my noggin kicked in and I realized that if your dough is thick it will hold its shape when you transfer it to the cookie sheet.
  • If your cut-outs keep breaking, roll out your dough directly on the cookie sheet. That way you don't have to deal with all that crap.
  • Place cookies in the freezer for 15 minutes after frosting them to allow the frosting to set. This makes them easier to transport or store without getting a mess of frosting everywhere.

Warnings

  • Making sugar cookies always results in a flour fight.
  • You will probably eat more than you give away, so have your sweat pants ready. They're so good!
Cut-out cookies are great for summer occasions: graduation parties, pool parties, softball teams, cook-outs. You name it and I have a cookie cutter for it. Keep me in mind if you want something like this:


or this:


And how cute are these!


Marilyn's Sugar Cookies:

3/4c. shortening (part butter or margerine, softened)
1c. sugar
2eggs
1tsp. vanilla or 1/2 tsp. lemon extract (or both)
2 1/2c. flour (not self-rising)
1tsp. baking powder
1tsp. salt

Mix thoroughly shortening, sugar, eggs and flavoring. Blend in flour, baking powder and salt. Cover. Chill at least one hour.

Heat oven to 400 degrees. Roll dough 1/8in. thick on lightly floured cloth covered board. Cut into desired shapes. Place on ungreased baking sheet.

Bake for 6-8 minutes or until very light brown.

Make four dozen 3-inch cookies.

2013-06-21 21.03.47.jpg


Monday, June 24, 2013

Cupcakes, cookies and a cure: an irresistable fundraiser

2013-06-21 21.40.07.jpg


Thank you to everyone who supported my bake sale Saturday. Because of your cupcake consumption and generous donations, I was able to raise $260 toward the Susan G. Komen 3-Day Walk I'll be participating in later this summer! I only have about $150 more to raise, and I'm confident I'll get there.

Bake sales are hard work, but they are a hoot of fun! What was really nice for me was that I used to work at Walgreens, where we held the bake sale. It was nice to have every customer come up to me with a smile rather than with a return item, a pocket full of coupons and a grumpy attitude.  When people walk in the door and see a table full of baked goods and pink posters, they're automatically happy. That's a fact.

2013-06-22 11.44.41.jpg
Who wouldn't smile at the sight of all this?


7 Steps to a Successful Bake Sale (from cozi.com)

  •  Gather a team.

    I wouldn't have survived this bake sale without some help. I asked my friend Kayla a month ahead of time if she would bake a couple things, but she also volunteered to help sell with me. She helped set up, take down, and price and wrap items. Sometimes I forget how important she is to my level of calmness. Without her, I'd be lost in my own little fairy land. She brings me back to reality when I need it. Her mom was also a big help, making a cute little cake that captured what the whole fundraiser was about. I also had volunteer baking from my friend Abby and a worker at Walgreen's who heard about the sale. And of course, my momma, who drank wine with me while I baked. Let people help you. You'll realize how much you need them.

  • Thank you to my awesome team of helpers
  • Choose the best spot: Walgreens on a Saturday is poppin. We nearly sold out after 2 1/2 hours!
  • Get the word out: Tell EVERYBODY about your bake sale. Post photos on Facebook and advertise. One girl I know came promptly at 11 am for two cupcakes and no need to even be at Walgreens. How exciting!

  • Start baking! Cookies were a hot item at our bake sale. We also had brownies, banana bread, banana muffins, cupcakes of all kinds, pineapple upside down cake, puppy chow, and a cake!
  • Boost sales with bonus items: Momma had breast cancer ribbon tattoos and pink beads for little kids. Buy a cookie and get a tattoo! Kids fell for it.
  • Pay attention to presentation: Make sure you have a way to package everything. Extra sacks will help for people who want a ton of your yummy baked goods. Have cool posters that dress your table up, too.
  • Be prepared! Make sure you have a cash box with plenty of change, a folding table, napkins, paper plates, price tags, posters, serving utensils, and anything else you might need. And don't forget your smile!
Most importantly, remember why you're doing it. You can't help but feel good about all that hard work work when it's going to something that will help others. Being in a small town, we knew just about everyone who came by. But a couple customers who I didn't know saw our table, came by and said they had lost someone to breast cancer. They said they'd be a fool not to support the cause.

Life isn't always as good as cupcakes and cookies, but when you can eat one knowing it's for a cure to end breast cancer, they taste even better.

2013-06-21 21.40.07.jpg
Keep calm and sell cupcakes.

2013-06-21 21.39.46.jpg2013-06-21 21.03.36.jpg2013-06-21 21.08.10.jpg


Check back tomorrow for more on these fun breast cancer ribbon sugar cookies.

2013-06-21 21.03.47.jpg2013-06-21 22.23.03.jpg2013-06-22 11.14.33.jpg

Monday, June 17, 2013

Dads and their cookies

As I said in my Father's Day ideas post, I wouldn't be making any fun cupcake recipes for my dad. 

I learned this year that cookies are the desserts for dads. It does make sense: eating a fluffy, frosted and sprinkled cupcake looks and sounds a little girly. Stuffing a half dozen cookies in your mouth is maybe more acceptable for a man, (although this girl does it often, with grace). 

Since Tom Chalkey is afraid of change and very much stuck in his ways (I can't wait to see how he handles moving to the suburbs), all he wanted was chocolate chip cookies.

"No M&Ms or pretzel crap. Just plain ol' chocolate chip cookies. Can ya do that for your dad?"

How boring. Delicious, always, but why not try something new.

This year I've been blessed with the gift of baking for a second father, Kyle's dad, John. He also wanted cookies, but luckily I got to mix it up a bit. John has been asking me to make him cowboy cookies since the first time I brought cupcakes to their house.

Every time I show up with a newly inspired cupcake to test on the Barichello's, John greets me with, "When you gonna make me some cowboy cookies, man?" For Father's Day, he deserved to get his cowboy cookies.

I had never made them and I'm not sure I'd even tried one before. Cowboy cookies are thick and chewy. They typically are made with oats, chocolate chips, coconut flakes and pecans. They can be made with several variations, such as peanut butter, walnuts, white chocolate, cranberries, etc. John wanted me to make them how his mother used to make them when he was a kid. Of course, he couldn't tell me how she made them, but he remembered that they were called cowboy cookies.

So I made a recipe I found online, which is about the same as a recipe for chocolate chip cookies. You can add 2c. of oats, 1/2c. shredded coconut, and 1/2c. chopped pecans.

2013-06-12 18.19.48.jpg
Fresh out of the oven, soooo good!

I could have eaten the dough by itself without ever getting around to baking them. These cookies are so delicious. You get the awesomeness of a chocolate chip cookie, with a crunch of oats and pecans and the sweetness of the coconut. Those of you who don't like coconut (unfortunately there are a lot of you), you should probably just suck it up for this cookie. The coconut isn't overpowering and complements the other ingredients well.
2013-06-12 18.19.24.jpg
Sharon said these were gone the next day. John must have liked them!

I didn't get to see John's reaction or hear yet if they matched his mother's, but I hoped they at least reminded him of them a little bit. I'm happy to have a new recipe, and awesome dads who like cookies.

Saturday, April 27, 2013

Heart-shaped Cookies Make the World Go Round, plus Texas Sheet Cupcakes!


    Volunteer cupcakes are the perfect opportunity to test out a Pinterest recipe.
My friend Kayla has made me her cupcake slave, and it's the best job I never had. She keeps having fundraisers and things that she just so happens to need cupcakes for. That, or she wants to make me feel that my baking has a purpose. Either way is appreciated.

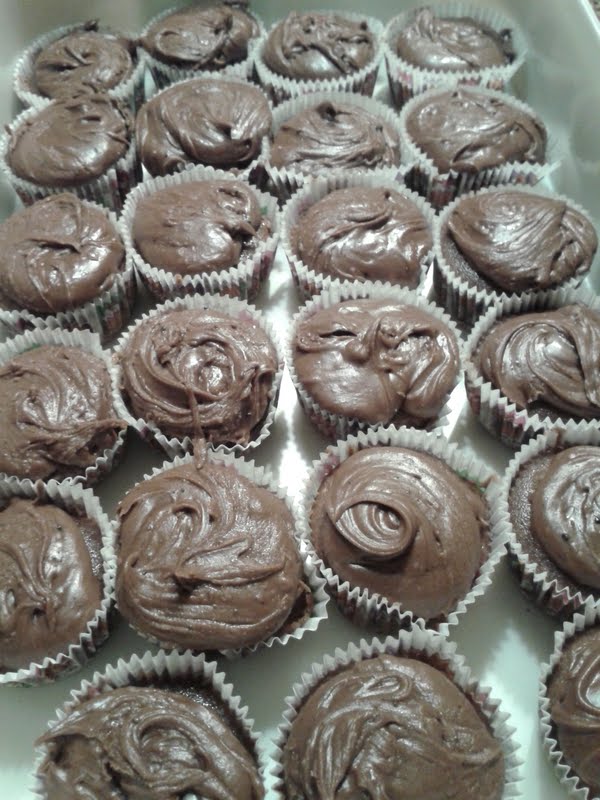
For her scrapbooking fundraiser, I tried out a recipe for Texas Sheet Cupcakes. You all know what Texas sheet cake is, basically a single-layer chocolate cake with a rich as hell chocolate glazed icing. They're basic, but awesome. Plus, it's more appealing to say "Texas" when referring to cake.
The recipe isn't too hard, although there is some stove work. The icing pours right on, so you don't have to worry about being fancy. The finished product is insanely good and rich and, of course, must be served with a glass of cold milk.
 
 
In the same night, I needed to make a dessert to take to Kyle's for the weekend. What kind of girlfriend shows up to their boyfriend's house without baked goods? Not this one.
His favorite is oatmeal raisin cookies. Pretty standard, but I wanted to leave an impression, so I turned to Pinterest. Thus I found a heart-shaped oatmeal raisin cookie cake. It was the perfect amount of awesome that I was going for.
 
Girls, I highly recommend turning any batch of cookies for your boyfriend into a heart-shaped cookie cake. For one, they're still delicious cookies. Two, he'll think you went out of your way, when really it's quite easier and a lot more fun.
There might be better recipes out there for the actual cookie part. After refrigerating the dough for an hour, it seemed very dry. I added a couple teaspoons of water and pressed it all together, which worked fine. Also, I used Craisins instead of raisins, because that was what I had.

The maple frosting, however, was incredible. Kyle, who hates frosting, absolutely loved it.
I will definitely make this again and maybe add some white chocolate chips or something fun. Or maybe on a rainy night I'll just whip up the maple frosting for myself.


Texas Sheet Cupcakes

 
Ingredients:
1 cup butter
1/2 cup water
4 tablespoons unsweetened cocoa powder
2 cups all-purpose flour
2 cups white sugar
1 teaspoon baking soda
1/2 cup buttermilk
2 eggs
1 teaspoon vanilla

Preheat the oven to 350 degrees. Place 24 cupcake liners into muffin pans. In a small sauce, bring the butter, water, and coco powder to a boil. Turn off and set aside. Combine flour, sugar, and baking soda. Add eggs, buttermilk, vanilla, and coco mixture. Stir until well blended. Pour into cupcake liners. Bake for 18 - 20 minutes or until done. They will be moist. Do not over cook. Cool completely.

Fudge frosting:
6 tablespoons milk
4 tablespoons unsweetened cocoa powder
1/2 cup butter
4 1/2 cups confectioners' sugar
1 teaspoon vanilla extract
In a small saucepan, combine milk, coco powder, and butter. Bring to a boil. Remove from heat. Add vanilla and powdered sugar.Stir until it starts to thicken slightly. (I stirred it for 3 1/2 minutes) Drop a tablespoon full onto center of each cupcake. The frosting will thicken quickly, so do not make the frosting until ready to put on cupcakes.

*This is a pour on frosting. It is not a spread or pipe on. It will still be a little runny when it is applied. The frosting will harden as it cools on the cupcake. The best way to tell when it is ready to use is to drop a spoonful on a plate and see how far it spreads. When it spreads just to the width of a cupcake, it’s ready. If it spreads too far, stir for a little longer
 
 
Oatmeal Cookie Cake
 
Makes one 9 inch cookie cake3/4 cup butter
3/4 cup light brown sugar
1/4 cup sugar
1 egg
2 tsp vanilla extract
2 tsp cinnamon
1 3/4 cup flour
2 tsp cornstarch
1 tsp baking soda
1 1/2 cups Old Fashioned Oats
1 cup raisins
1. Cream butter and sugars together until light and fluffy, about 3-4 minutes.
2. Mix in egg and vanilla extract.
3. Add cinnamon, flour, cornstarch and baking soda to a medium sized bowl and combine.
3. With the mixer on low speed, add flour mixture to butter and sugar mixture.
4. Stir in old fashioned oats and raisins. Dough will be thick.
5. Chill for at least 30 minutes or overnight. I very much recommend overnight.
6. When ready to bake, preheat oven to 350 degrees.
7. Place parchment paper into the bottom of your cake pan to help the cookie not stick.
8. Spread the dough out into the cake pan. Bake for 22-25 minutes or until the edges are slightly golden. The center may not look completely cooked, but it is.
9. Remove from oven and allow to cool completely in the cake pan. Be careful of removing the cookie cake from the pan too soon. If it hasn’t cooled enough, the center will be very soft and easily breakable. I let mine cool for at least an hour before removing.
Cinnamon Maple Icing
1/4 cup butter
1/4 cup shortening
2 cups powdered sugar
1 tsp maple extract
1/2 tsp cinnamon
1-2 tbsp water
1. Beat the shortening and butter together until smooth.
2. Slowly add powdered sugar. Mix until combined.
3. Mix in the maple extract and cinnamon as well as desired amount of water to get the right consistency.
Enjoy!